Thursday, June 30, 2011

Color Wheel Quilt, Part III


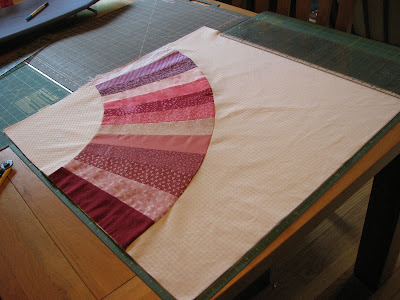
I realized that I wanted to make a quilt that fit a bed, so I went upstairs with the quilt top, a measuring tape and pencil and paper yesterday and figured out what that would take. I spread the new top on our king size bed so the whole thing would be visible but it's really made to fit a full-size bed with enough overhang to overlap with the frame, covering the boxspring and mattress edges. It's kind of cheater-supereasy quilt piecing but I think it works really well for this quilt and, from cutting through piecing, adding the border only took about 5 1/2 hours. I actually think I like it even more now with its frame. Of course, I always prefer homey and useful to art quilt so I shouldn't be too surprised.

Adding to the Color Wheel Quilt
(These instructions expand the quilt top to 72"x88", enough for a full bed)
Choose a sequence of 18 colors from the quilt and cut 2 - 3 1/2" x 12" rectangles from each fabric.

Choose another sequence of 19 colors from the quilt and cut 2 - 4 1/2" x 20" rectangles from each fabric.

I wanted to have the whole flow represented so I did selectively remove some fabrics. For example, there were two reds in the original and I took one out. There were also a lot of greens and warm purples so several of those were left out as well. I made sure the two sequences I picked met each other at a harmonious place as well.

Piece the strips (using 1/4" seams) so you have 2 identical 20" wide strips and 2 identical 12" wide strips.

Pin the 12" wide strips to two opposite sides of the color wheel so matching fabrics end up diagonally across from one another. Sew the seam using a 1/4" allowance. Press the seams toward the colored fabric.

Repeat pinning and sewing with the 20" strips on the remaining sides of the color wheel, making sure they are aligned to complete the color flow from the side strips. The same fabrics will again end up diagonal from each other across the quilt. Press the seams toward the colored fabric.

According to my calculations, I'm now going to need 5 1/3 yards of 44" wide backing fabric, cut into two 8' pieces and sewn together along a selvedge edge. I haven't figured out how much more bias strip I'm going to need yet.

First Blueberries

Wednesday, June 29, 2011

Time to Make Dinner

I've been enjoying being able to make dinner every night without having a time limit or lack of energy to deal with, both of which I faced when we got home at 5:30p every night. What I enjoy, I take pictures of, so here are a few snapshots of recent meals.
Here's last night's chicken pot pie. No recipe, I just cooked the garlic, onion, potato, turnip, carrot and celery on the stovetop with some thyme, rosemary, tarragon, salt and pepper until everything was tender. I added the peas and boiled chicken last with some white wine and chicken broth and mixed in some cornstarch. After the biscuits got put on top, the whole thing baked in a 450 oven for 15 minutes.

For the falafel, we buy the tzatziki and feta already made. I cooked and mashed the garbanzo beans in the morning and set the pita dough to rise. I pan fried the pitas, so they were really more like chapatis. I'm still working on making them thin enough that they're bendable when they come out but Q said his open faced sandwich was still very good. The falafel just had egg, almond butter, celery, onion powder, cumin, turmeric and salt mixed into the beans. The patties were dredged in bread crumbs, sprayed with oil, and baked for about 25 minutes at 375, turning them halfway through.

When we have tacos, one thing that's made a huge difference in their deliciousness for us is frying our own shells using corn tortillas. It takes almost no time and they taste a lot better, since they're quite a bit fresher. Here's Q's mini-photoessay of the process. :)


Lastly, here's a "pie" for the chickens to enjoy, rather than the humans. A friend gave me some ciabatta that was too tough for the chickens to tear apart on their own. I tore it up and soaked the pieces in water. We also had a few cherries that had gotten past their prime. It accidentally got quite a bit more picturesque than most of the chickens' treats.
We've also got pesto, chicken salad, grilled lamb chops with baked potatoes and broccoli, and saag paneer on this week's menu. I've found that I'm a much happier camper if we plan the week's meals out over the weekend and do the grocery shopping then. Otherwise, morning comes and I draw a total blank on what to have for dinner. Any meals that are favorites for any of you?

Tuesday, June 28, 2011

Color Wheel Quilt, Part II

I actually followed the pattern for this quilt. I copied the templates out of the book, rechecked them to make sure they were exact matches, carefully cut the fabric just like I was told to do, made sure each seam in the arcs of color was exactly 1/4". For me, this is a rare event but I know that quilting is an art of precision.

All of this is why I blindly trusted as I eased the color arc onto the inside and outside arcs yesterday.

The pattern gives a system for finding the middles and the middles of the halves and so on so the fabric can get evenly distributed and she suggests putting in pins only about an inch apart by the end. Clearly it's a tricky thing to do, so I wasn't to worried as I fidgeted it into place. When I got done I was left with this...

I tried it on two quadrants and then realized that I needed to take a breath and try a fresh approach today. For the fresh approach (after some seam ripping), I started by again comparing all four pieced color arcs. Just as I'd remembered, they'd all turned out the same size.

The next step was seeing where the pieces would overlap if everything was lying flat. Presto! The problem became extremely evident, since the white arcs didn't match what the color needs to do. When everything was laid out with the color on top, I used the disappearing pen to mark 1/4" under the color section. Then I pinned, making sure the color was always 1/4" toward the edge from my disappearing "stitching line".


It worked, I got four pieces that lay flat but now the edges were all wonky, not square and not all lining up with each other. After making sure that all the color arc endings had their tops and bottoms lined up, I did a very scary thing. I cut the whole thing off to 27" square. It was terrifying; there are some things that there are no coming back from in sewing.
Thankfully, after I sewed the last seams to complete the largest 4-patch quilt block ever, the top lies flat and, I think looks great. It's a little bumpy in the picture below because it's hastily spread out on the squishy bed and it hasn't gotten a final press.
Now I just need to get the backing fabric, thread baste it all together and draw in the quilting lines. We're planning on having a quilting bee baby shower at the beginning of August where all my friends are going to help quilt it.

Monday, June 27, 2011

Brown Cabled Sweater

This was adapted from the Hawthorn Pullover in Interweave Knits except I wanted a cardigan. This yarn has been trying to become a brown cardigan for 3 or 4 years and had gotten it's first several inches knit in an entirely different pattern before getting ripped out. The latest incarnation made it onto the "must get done before the baby comes" list of project finishing. I knew that it would languish indefinitely if it waited any longer.


I can't model it because it's sized to "pre-baby" me. I wanted it to be quite form fitting because there were sleeveless dresses I wanted to wear with it in fall. I'm a little worried the sleeves turned out too snug but we'll have to just wait until post-baby sizing to get a true picture. Here I come Fall 2012! :)

Today was one of those crazy productive days.
  • Milled enough wheat to fill the gallon jar of flour
  • Garbanzo beans were cooked and pita dough was made for falafel tonight
  • A batch of strawberry jam was made
  • Out in the garden I had my first "snack as you go" for the season - peas, radishes, strawberries and one tiny carrot that needed to be thinned. There was also a lot of grass removal and seed planting as well as almost 6 lbs. of strawberries harvested.
  • One load of laundry was folded along with other miscellaneous cleaning
  • Two quarters of the color wheel quilt got done - although they may have to be resewn. Getting the curve pinned and sewn so everything lies flat is very very tricky.
At about 3:30p, I came in from the garden and noticed my ankles were swelling so I've put myself on a prescription of fluids and putting my feet up for the rest of the day. Considering my challenges self-regulating, it would probably be helpful if nature gave me such clear signs of overdoing it even when I wasn't pregnant. I do hate "cankles" so I'd probably pay attention.

Saturday, June 25, 2011

In the Kitchen

Here are a few adventures from the kitchen this week...
I spent over a day babysitting drying spent grain from Q's weekend brewing in the oven. If it had been warmer I would have spread it outside to dry. The chickens love this stuff and now it's been preserved so I can keep supplementing their feed with it. It was in rimmed baking sheets in about 1/2" layers and stirred every 20-30 minutes at 250 degrees.

Here are some roasted potatoes for a potluck this afternoon.

Strawberries and biscuits are a family favorite for breakfast during this time of year.

I also made a batch of strawberry rhubarb honey jam. It turned out really fantastic but I only got 4 pints instead of the 5 pints I filled. As I put one into the canner, there was a loud pop and the bottom of one of the jars just broke off.

I'm going to make at least one batch of strawberry and, hopefully, a batch of blueberry jam, which should get our jam closet stocked for the year. We actually ran out this spring; rather shocking really!

Thursday, June 23, 2011

In the Garden

Since it's been a while since I did a virtual garden tour and things change so fast this time of year, it seemed like it was time for a visit.

Here are the 5 lb. 10 oz. of strawberries I picked this morning from the front 1/3 of the bed. That's right, I didn't even get the whole bed picked over. They're nestled in with the popcorn and lettuce.
The peas have a few pods that are starting to get fat.
The oats are very robust but I was worried earlier this week because it seemed like some were lodging (tipping over), which would indicate too high a ratio of nitrogen to phosphorus. They don't seem to be getting any worse and I think we don't have too much growing left to do, as evidenced by...
...the beginnings of seed heads. Yay!
The first and second plantings of edamame. The potatoes at the far end have one that's blossoming. Potato blossoms are so unexpectedly cute. I mean, who would expect it of a potato?
The coreopsis are starting to bloom, the irises are slowing down and the bachelor buttons just keep going. The daisies are getting ready to burst.

The blueberry bushes are incredibly heavily laden but are still definitely green. Hurry up blueberries!

Wednesday, June 22, 2011

Diaper Bag

Everybody needs a diaper bag and I'd been totally in love with the 8th grade's messenger bag project in handwork this year. A few hours at Craftacular Getaway and presto...
I'd had the body fabric in the stash for years and I just picked up the dots as a remnant because I knew they would coordinate with the other one. There is a layer of heavy duty canvas lining the outside layer. It gave the bag some nice body and it will help considerably with durability. I'm glad I went with it instead of just using interfacing because it really wasn't any more work. The flap does have single side fusible interfacing between the two layers.

Before we left, I picked up the roll of wide dark brown grosgrain ribbon and D rings at Joann's and grabbed elastic and zippers from the stash. (That's right, I had two dark green zippers in the stash from Grandma that matched the fabric.) Yesterday, we headed into Springfield to Econosales and got the webbing and hardware for the strap. I love the way the "real" strap makes it look professional.

My favorite part of this project was the freeform creative process. I used the 8th grade bag to get the front/back/flap pattern template and decided in advance what pockets I would want and where and then just approached each challenge as I came to it.

Water Bottle Pocket
There's a strip of brown grosgrain centered along the entire side/bottom gusset, which I used to affix the D rings. On one side I added the water bottle pocket. It was pleated at the bottom and has 1/4" elastic run through a casing at the top.

Underflap zippered pocket for wallet, keys and phone
The canvas and circle fabric for the front panel had to be cut 1" too tall and were then cut apart to install the zipper. The last of the dot fabric was pieced to create the pocket back and stitched to the back of the zippered section before the whole panel was sewn into the body of the bag.

Inside pocket, probably for pen, pencil and other sundries
The construction of the inside pocket is pretty self explanatory and it was sewn to the lining panel before the lining was sewn together.

I love how cunningly these bags are constructed. After all of the panels have had any modifications made to them (pockets, decoration, etc.), the flap is sewn right sides together, turned, pressed and topstitched around the edge. The outside is sewn into a bag shape and the flap is sewn to one top edge. The lining is also sewn into the bag shape, leaving a few inches of gap in one of the bottom seams. Finally, the lining and the outside are sewn together around the top with right sides together and the whole bag is turned inside out through the gap in the lining. After the lining whole is blind-stitched closed, it kind of seems like magic allowed the bag's construction. The last step is topstitching around the top edge of the bag.

I want to get some coordinating waterproof fabric and make a travel wet bag like this. I'm planning on getting a single package of commercial wipes, like these, so I can use the box when they're all used up and probably cover it, like this (sans yoyo).

Also on the diapering front:
  • Using the serger to whip up some flannel rectangles to use as reuseable wipes is on the to-do list. The Lusa Organics Baby Wipe Juice we ordered came today and it smells fantastic! Assuming it works as well as everyone seems to think it does, I'm excited to try it. It seems well worth the indulgence of not making my own.
  • I still need to get some snappies and diaper pins so we can try both and see which we prefer. (Mom, do you still have any diaper pins and diapers from when we were small?)
  • A friend will be dropping off a variety box of small used diapers soon and we're also planning on trying Ruby's Diaper Service. I'd like to take on laundering my own but I think using a service in the beginning will make our first weeks a little easier.
  • I've got some calendula infused oil that I made last summer and am going to make some calendula cream to have on hand for any rash. I'm waiting on my vitamin E in the mail.
  • There's also lanolin finding it's way to me through the mail. (It's really hard - read impossible - to find locally) We're going to try the traditional wool soaker route but I'm going to have at least one plasticized cover on hand just in case. Using wool from my stash I've been playing with Little Turtle Knit's hybrid rib soaker pattern. It seems like a great pattern; it was easy to follow and the first one came out looking adorable but that's a post for a different day...

Tuesday, June 21, 2011

Dress Reconstruction

When we were in Denver, I came across the pieces of a dress in her stash. I think I remember seeing it pre-demolition. The blue part was the body of a muumuu and the white was a ruffle all around the bottom. The straps were somehow affixed at the shoulders. I took it because I love the fabric and it looked like an easy project.

When I got done with the reconstruction, I had this much left as scrap.

I apologize in advance for the bad photography. To make the new top, I used what had been the bottom hem as an elastic casing. I joined the two main body pieces with a slight gather and, fearing that it would be too narrow to go over my shoulders, I installed a short zipper in the left side. (I love my inherited zipper stash.) The bottom was just sergered, pressed up, and stitched in place. The straps are sewn on at the top and bottom of the elastic casing and the buttons are purely ornamental. It fits without having to use the zipper but I suppose it's always better to have the option. Since the gathered portion is looser than I'd originally anticipated, I think it would work as a nursing top even after baby is born.


I think that it ended up being about a three hour project.
The best part is that it even had pockets already built in. Clearly it was meant to be!

Monday, June 20, 2011

Transformation Behind the Shed

As promised, here's the before and after of the space behind the shed that we hired a guy to clean out. We think we need to go over it with a rototiller before planting it with some clover. Wouldn't the bees like that when we get a new hive in that box? We've also been offered some lilac bushes from a friend and are thinking of planting them along the side fence to create a more opaque barrier there.

Before

After

Bottling on Father's Day

While I was at the coast on a Craftacular Getaway, Q spent Saturday brewing a batch of beer from grain with a friend. He's hopefully going to post about that soon - I'll add a link when he does. It did inspire us to take care of old brewing business to make space in the pantry for the newly full 5 gal carboy.

The apple cider has been sitting for quite a while. After it first reached 1.000 specific gravity, we tried to kill the yeast and then added more sugar but we failed and the yeast just gobbled up the additional sugar. We let it sit again until all that sugar was definitely eaten up and then finally got around to bottling it on Sunday. We added 2c water that had been heated with 1/2c sugar then cooled to the 5 gallon carboy to prime it so it will be slightly carbonated. It is quite dry but has a great apple aroma and my sip suggested that it's a pretty decent batch. (Just watch out for the approximate 12% alcohol content!) Here's to 22 bottles of cider I can't drink! ;p

We started the cherry wine on July 12 last year and, after several rackings and several months of procrastination, we got corks and a corking tool from the brew store yesterday. The sip I had suggested the wine is definitely drinkable. It will be interesting to see what a few months in the bottles will do for building character. We're calling it "Christmas wine".

Here's Q with the cats on his first Father's Day.


Craftacular Getaway 2011

Four of the "craft circle" ladies rented the Falcon View at Heceta Head ( a couple blocks from the beach just north of Florence) and spent 48 hours doing whatever we felt like doing. We've done it once before but we really need to focus on making it a yearly event. It was heaven.

The Creations
M made the paintings and sewed the binding on the two books pictured.

C worked on the burgundy/brown quilt strips draped across the center of the couch and read a lot about cheesemaking

V made the blue and yellow picnic quilt that's draped under everything and finished the amazing aqua dress in the upper left corner. (The picture really doesn't do it justice.) She also created a pants pattern based on some linen pants she loves.

I altered/fixed several maternity clothes (two pillowcase dresses into square neck tanks, shortened the shoulders of a sundress and shortened 1 pair of pants - all in the lower left), started reconstructing a blouse out of reclaimed fabric from another garment, and made a diaper bag. The blouse and diaper bags are getting their own posts. It felt good to get so many little tickly projects off my to do list.


I really had to post a couple pictures of the food. We do know how to eat and since we're all used to being the cooks for our families, it felt like meals prepared themselves. Highlights...

Dinner
artichokes, ciabatta bread, chicken breast, salad greens, and tabbouleh

Lunch
homemade gouda (M), homemade chevre (C), brie, dried figs, ciabatta, pears and cherries

Saturday, June 18, 2011

Cherry Pie

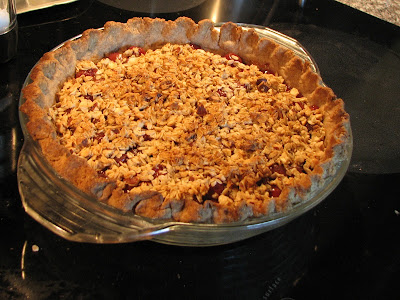
Here's Q's cherry pie that I made him for Father's Day. Cherry pie filling canned last summer, whole wheat pie crust, and melted butter/oatmeal/almond pieces as the topping.

Friday, June 17, 2011

Zucchini Cookies - Cooking with Honey III

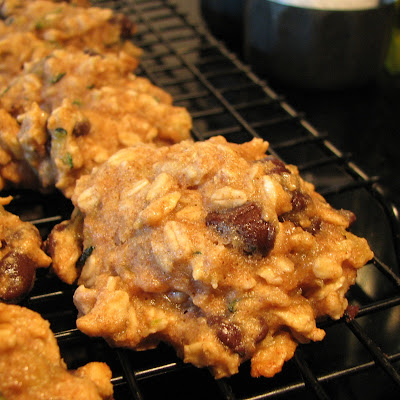
I love cookies. I've realized over the last year or so that my love for them is much greater than I used to believe. I actually get cookie cravings now and pie or ice cream or cake or my many other dessert loves will just not cut it. Fearing for my (lack of) post-baby waistline and knowing breastfeeding can only do so much, I chose to make these when I decided cookies were a must for Craftacular Getaway 2011. They're the cookie that's (almost) healthy.

I first blogged about making them last summer and now that I know the original recipe rocks, I modded it into a former shadow of itself based on healthier/more local/what I had on hand choices. Here's the adjusted ingredients list with the caveat that for the honey and puree I guesstimated as I dumped it in. They still bake at 350 degrees and mine took 13 minutes.

1 1/2 c honey
1/2 c butter
1/2 c apricot puree
1 1/2 t cinnamon
1 t salt
2 T Bob's Red Mill egg replacer (I didn't add the water the bag calls for since the honey is wetter than sugar)
1 t vanilla
18 oz. grated zucchini (thawed from frozen then pouring off about 1/4 c of water)
3 c whole wheat flour
3 c rolled oats
1 t baking soda
2 1/2 c chopped walnuts
1 1/2 c chocolate chips

I baked up 36 cookies, which I think was about half the batch. The rest got rolled up as a log in saran wrap, put in a freezer bag, and frozen for future use.

Thursday, June 16, 2011

Metamorphosis


Q and Mom and I found this guy alive and kicking when we were working in the yard last week. None of us recognized what he was so, despite his "Aliens" appearance, we gave him the benefit of the doubt as a beneficial and freed him over by the compost pile. He had no wings and used the four visible legs plus two up at the front, which aren't really visible and reminded me of praying mantis arms, to crawl around. Today when I went out to train the grapes a little I found his husk affixed to one of the grape leaves. I'm so curious what he became. Any ideas?

I got the potato patches mulched today so only a few inches of stem are showing again. Lettuce was harvested to take to the handwork weekend and I'm going to get some seed planting done before I go - more radishes, carrots, lettuce, and spinach as well as sunflowers and basil.

Wednesday, June 15, 2011

Bowl of Berries

The strawberries are finally enough that it's not a few berries here and there as a snack. I got 1 lb. 5 oz. today - apparently the maximum my sweatshirt pockets can hold.
Third trimester tummy muscles don't agree with harvesting position very much so it looks like Q might have to take on more harvesting duty this year than he's previously done. Luckily he's always been a good sport about it. I left a lot of "almosts" on the plants today, so I'm guessing there will be at least another 2-3 lbs. ripe for a pick on Friday.

The squash we planted out over the weekend are still looking great and these guys have another week or so of hardening off before they go into the garden. I haven't had my usual problem of "sunburn" this year with the starts, so I may have to show a little gratitude for the cloudy days we've been having.

I never got any basil started, does anyone have experience with direct sowing it outdoors in the Willamette Valley this late in the spring? I hate to buy starts for something that grows so easily and our good weather here usually lasts into October, so it seems likely that it would work.

Here are the oats and corn...