Showing posts with label quilting. Show all posts

Tuesday, September 6, 2011

Color Wheel Quilt, Part V

Mom left this morning. :( We'll sure miss her. While she was here, she set the quilt up in her room and she worked on it more than I imagined she would. She worked so much that she finished it! I still need to finish the binding but all the quilting is done and it turned out just as beautifully as I hoped. I'm sure Willow will love it when she gets old enough to move to her big girl bed.


Mom took this picture and I just had to share it here...
Thankfully, the diaper service has started now and we were gifted a few weeks of respite before this scene starts again. :)

Wednesday, August 31, 2011

Color Wheel Quilt, Part IV

After the shower, the hostess kept the quilt set up for the next craft night and craft day and we even got a roll done. After we took it home, Mom wanted to be able to work on it so we got it set up in the guest room for her.
She says that it's perfect there since she only needs half of the bed anyway, the cats can't get to it, and she can quilt into the night without disturbing us.

Thursday, June 30, 2011

Color Wheel Quilt, Part III


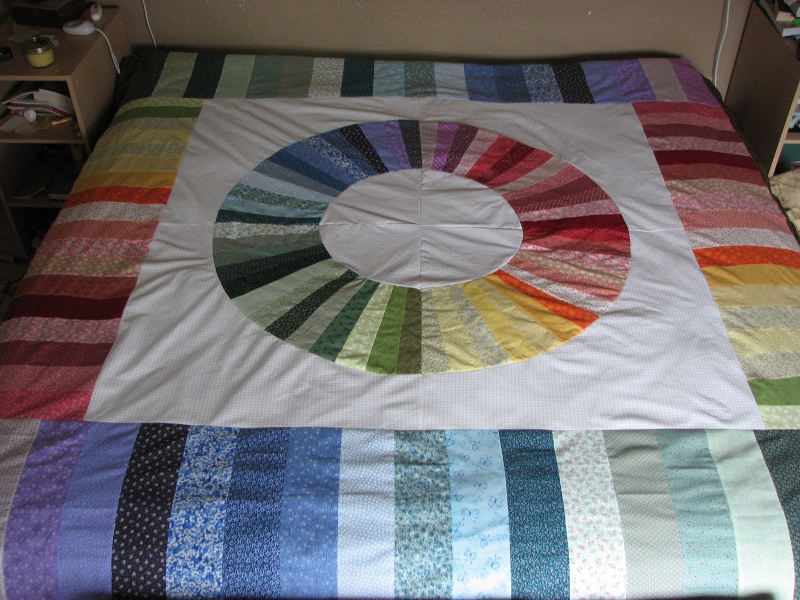
I realized that I wanted to make a quilt that fit a bed, so I went upstairs with the quilt top, a measuring tape and pencil and paper yesterday and figured out what that would take. I spread the new top on our king size bed so the whole thing would be visible but it's really made to fit a full-size bed with enough overhang to overlap with the frame, covering the boxspring and mattress edges. It's kind of cheater-supereasy quilt piecing but I think it works really well for this quilt and, from cutting through piecing, adding the border only took about 5 1/2 hours. I actually think I like it even more now with its frame. Of course, I always prefer homey and useful to art quilt so I shouldn't be too surprised.

Adding to the Color Wheel Quilt
(These instructions expand the quilt top to 72"x88", enough for a full bed)
Choose a sequence of 18 colors from the quilt and cut 2 - 3 1/2" x 12" rectangles from each fabric.

Choose another sequence of 19 colors from the quilt and cut 2 - 4 1/2" x 20" rectangles from each fabric.

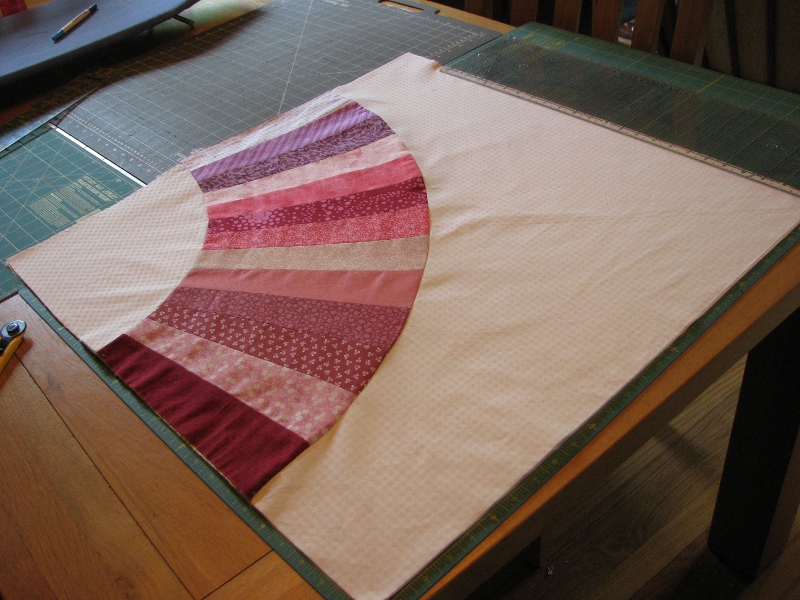
I wanted to have the whole flow represented so I did selectively remove some fabrics. For example, there were two reds in the original and I took one out. There were also a lot of greens and warm purples so several of those were left out as well. I made sure the two sequences I picked met each other at a harmonious place as well.

Piece the strips (using 1/4" seams) so you have 2 identical 20" wide strips and 2 identical 12" wide strips.

Pin the 12" wide strips to two opposite sides of the color wheel so matching fabrics end up diagonally across from one another. Sew the seam using a 1/4" allowance. Press the seams toward the colored fabric.

Repeat pinning and sewing with the 20" strips on the remaining sides of the color wheel, making sure they are aligned to complete the color flow from the side strips. The same fabrics will again end up diagonal from each other across the quilt. Press the seams toward the colored fabric.

According to my calculations, I'm now going to need 5 1/3 yards of 44" wide backing fabric, cut into two 8' pieces and sewn together along a selvedge edge. I haven't figured out how much more bias strip I'm going to need yet.

Tuesday, June 28, 2011

Color Wheel Quilt, Part II

I actually followed the pattern for this quilt. I copied the templates out of the book, rechecked them to make sure they were exact matches, carefully cut the fabric just like I was told to do, made sure each seam in the arcs of color was exactly 1/4". For me, this is a rare event but I know that quilting is an art of precision.

All of this is why I blindly trusted as I eased the color arc onto the inside and outside arcs yesterday.

The pattern gives a system for finding the middles and the middles of the halves and so on so the fabric can get evenly distributed and she suggests putting in pins only about an inch apart by the end. Clearly it's a tricky thing to do, so I wasn't to worried as I fidgeted it into place. When I got done I was left with this...

I tried it on two quadrants and then realized that I needed to take a breath and try a fresh approach today. For the fresh approach (after some seam ripping), I started by again comparing all four pieced color arcs. Just as I'd remembered, they'd all turned out the same size.

The next step was seeing where the pieces would overlap if everything was lying flat. Presto! The problem became extremely evident, since the white arcs didn't match what the color needs to do. When everything was laid out with the color on top, I used the disappearing pen to mark 1/4" under the color section. Then I pinned, making sure the color was always 1/4" toward the edge from my disappearing "stitching line".


It worked, I got four pieces that lay flat but now the edges were all wonky, not square and not all lining up with each other. After making sure that all the color arc endings had their tops and bottoms lined up, I did a very scary thing. I cut the whole thing off to 27" square. It was terrifying; there are some things that there are no coming back from in sewing.
Thankfully, after I sewed the last seams to complete the largest 4-patch quilt block ever, the top lies flat and, I think looks great. It's a little bumpy in the picture below because it's hastily spread out on the squishy bed and it hasn't gotten a final press.
Now I just need to get the backing fabric, thread baste it all together and draw in the quilting lines. We're planning on having a quilting bee baby shower at the beginning of August where all my friends are going to help quilt it.

Tuesday, June 14, 2011

Color Wheel Quilt, Part I

I've had a bunch of fabric pieces stashed away for about a year with the intention of someday actually getting the last few colors I needed together and cut for this quilt from "Last Minute Patchwork and Quilted Gifts". This morning I cut the 42 that I'd already put aside and arranged them to determine where my gaps were (picture above). I realized I was short on greens and I needed a true orange to transition to the yellows.

My stash of scraps (thank you Mom and Grandma - I call them the "stash of my ancestors") provided all the greens but no orange. I figured I'll just splurge and buy a fat quarter when I go to buy the white fabric for the background. Fifty-one of the colored pieces are now cut and numbered, ready to be sewn together (with one gap for the orange). Unlike the original, I think I'm going to do black for the bias and then choose a very small print calico in some oatmealy shade for the backing. I can't quite shut my practical side up to the point of being okay with making a quilt with a white edge and back.

Craftacular Getaway 2011 is only 2 days away so updates may be quickly forthcoming.