Saturday, January 30, 2010

Garden Plan

Spring is coming fast. The blueberry bushes have leaf buds (above). The flowering quince at the side of the house is about to bloom. I planted our first seed starts this morning.

The plan for seed starting is...
1/30/10 - 6 celery (Utah 52-70) and 50 onions (Talon)

2/27/10 - 12 cabbage (Derby Day), 12 basil (Sweet Basil), 12 tomatoes (10 Nova, 1 Oregon Cherry, 1 Siletz), 4 peppers (California Wonder 300), 2 eggplants (Millionaire), 2 cauliflower (Snow Crown), 2 broccoli (Thompson)

4/3/10 - 14 squash (2 Black Beauty zucchini, 2 Yellow Crookneck, 4 Mesa Queen acorn, 2 Fairy, 2 Banana Pink Jumbo, 2 Small Sugar pumpkin), 2 melons (Tigger), 4 cucumber (Wautoma)

To be direct sown are green beans, edamame, fava beans, black-eyed peas, carrots, corn, garlic, lettuce, snow peas, peas, beets, radishes, spinach, and potatoes.

We're also putting in asparagus crowns in about a week. We also hope to get the grapes in this early spring - Interlaken or Niagara, Elizabeth or Fredonia, and Gewurztaminer.

Monday, January 18, 2010

Baking with Spelt


I got busy today and baked one of our remaining pumpkins. The resulting quart of mashed pumpkin was quickly turned into bread. Hopefully, some of it will make it into the freezer, although it's disappearing at an alarming rate. (There was an additional small loaf that never made it to the photo shoot.)

I also found out that Q really loves toasted pumpkin seeds, so I'll have to get into the making those when I have a pumpkin. I think I'm going to try it on our next acorn squash as well. I can't imagine that it really matters what winter squash donates the seeds.

I also made a loaf of sandwich bread for Q's lunches this week. After so many months of trying to learn to bake gluten-free, using a grain that contains gluten seems like cheating. Bread just rises, no fuss, no muss. Brilliant.

Sunday, January 17, 2010

Craft Hope for Haiti

Craft Hope for Haiti Shop Spreading seeds of hope one stitch at a time

Craft Hope for Haiti is a project where crafters from all over have donated goods to be sold in their special Etsy shop. All proceeds are going to relief efforts in Haiti by Doctors Without Borders. I've sent in a donation but apparently they can't keep up with donations so we'll see how long it takes for mine to get listed. :) Donate or shop or just look and send good thoughts. In two days they've raised $7000. Not bad. Good stuff gets brought out by heartbreaking situations.

Kitchen Cure - The Results

The pots finally got hung tonight. I love just having the curtain in front of the pantry. Removing that door freed up all the wall space for the pots so I don't have to get on top of the cabinets to get them any more. The wreath of herbs hanging on the door was a Christmas present from my brother and his wife - pretty, yes?

Knife blocks are gone. (See the knife drawer below.) Isn't that vast empty counter great? I love it.
It's like this drawer was made for two blocks, which exactly fit how many knives we had.

Saturday, January 16, 2010

Hat Repair

My aunt, Nancy, has one of the sweetest dogs on earth but he does like to chew things. My future-cousin-in-law was visiting for Christmas and he left his hat, which apparently has sentimental value as well, too low. Ozzy was delighted with the new chew toy. The hat was rescued and Nancy sent it to me to see if there was anything that could be done.

The problem was a small ragged hole near the brim. I undid all of the edges back to an even point where there was enough length left to tie the ends off and picked up stitches at the top and bottom. The bottom stitches were, of course, live.

Here it is after the ends were tucked inside. The hole was seven stitches by ten rows.

The closest yarn I had was off white Cotton Fleece by Brown Sheep. I separated out two plies to get the right weight and knit a flap up from the live stitches. Using the Kitchener stitch (what I sometimes consider the most useful thing I've ever learned), I hooked the live stitches to the top of the hole.

Here it is after the edges were sewn but before the hat was washed. I decided to try tea dying to make the mending a little less obvious.

I wish I'd gotten the pre- and post-op photos shot in the same light. I plastered the new patch with tea grounds two times for about an hour each time. The whole hat was soaked in color safe bleach solution for a couple of hours before the dye attempt. Dogs do not preserve cleanliness in hats. It needed a good wash but I'd asked Nancy to not clean it before it was sent. I hated to run the risk of more damage.


I wish I'd had a better color match possible but I'm pretty proud of how the patch turned out - it's neat, durable, and serviceable. The color thing bugs the heck out of me but the dying did seem to improve it. I hope it will serve. It's better than just having to throw it out.

Friday, January 15, 2010

Naalbinding Workshop

I took a class at the University of Oregon craft center last weekend to learn a new technique. It's quite old but has been most commonly used in modern times to create "toothbrush rugs", so named because toothbrush handles are usually used to create the blunt, flat needle. This site
was the best I found online but it was a lot easier to learn from a person. I, of course, didn't want to do easy beginner stuff so I did round instead of oval and decided to figure out how to build up into a basket. Much more gratifying to walk out of the workshop with this half-done basket than a one hundredth done rug! I really the technique, although pulling everything through every stitch feels so inefficient after so many years of knitting.
It makes a very dense, almost indestructible, very stiff fabric. The "wrong" side shows inside the basket bottom and the "right" side looks like braid. It can be seen on the outside face of the basket. I was working with knits but she has done quite a bit with woven cotton (calicos). I'm hoping to use the technique for the pounds and pounds (boxes and boxes) of wool rug strips left to my mother and me by my grandmother.
(BTW- Digit would like to use the needle as a chew toy, so these were the most cat free pictures I could muster without extreme efforts.)
Q started a three week jewelry making class the same night. It's great to have the resource available. They have equipment available during open studio times for jewelry making, woodworking, ceramics, photograph developing, fiber arts and glass.


Last but not least, I must present last night's sushi - tuna and cucumber. This is the third time I've made sushi and my rolls are now firm and picturesque. I still need to make slightly less gloppy rice though. I also need to expand out to more/different ingredients.
If only food were photogenic. I've become more and more impressed with food photographers. I have yet to take a food photo I'm happy with. They always end up looking too...visceral?

Monday, January 11, 2010

Kitchen Cure - The Beginning

This fall Q linked me to the "Kitchen Cure" and I thought it would be fun so I signed up. I dutifully received each week's e-mail assignment and never got around to doing it. Over the holiday Q and I decided that we would do the cure in one big megaday clean-sweep on New Year's Day. (Four weeks of reasonable amounts of labor or one cram session? Easy choice!)

Step 1: Unload
Remove every single item from every single kitchen cabinet (and tops of cabinets). I'm impressed by what good organizers we are that all of this ever fits into our kitchen. We didn't completely remove everything from the pantry because most of it is just jars of canning, which means that it was all cleaned this August/September. We also didn't remove cleaning supplies from under the sink since that was done and cleaned under when we had a plumbing issue in November.


Step 2: Cabinet Maintenance
Q checked all the hinges and tightened where necessary. We cleaned every shelf, cabinet top, and all of the faces.

Step 4: Counters and Appliances
Oven door, microwave, and all surfaces got thorough cleanings. I sometimes forget between biannual-ish cleanings that one is supposed to be able to clearly see into an oven through the window.

Step 3: Sort
We got rid of quite of few things we didn't need - a nice start to the tax-deductible donation pile for the new year. It was satisfying to notice that the last couple years of "simplifying" have paid off though. We don't have too much stuff that we don't use on a regular basis.

Step 4: Reload and Rearrange
A few things got shifted around (dry goods are more accessible and all together, glassware is in a safer, less accessible spot, casseroles are now easy to get to)
Big changes were...
1) getting the knife blocks off the counter (in-drawer holders instead) - I hate cluttered counters!
2)cooking pots/pans are now going to be hung on the wall so short me can reach them. They used to be on top of the cabinets. (Q hasn't quite finished putting up the hooks.)

I'll post finished pictures as soon as Q hangs the pots. I wish I'd remembered to take "befores" but "afters" will still be pretty.

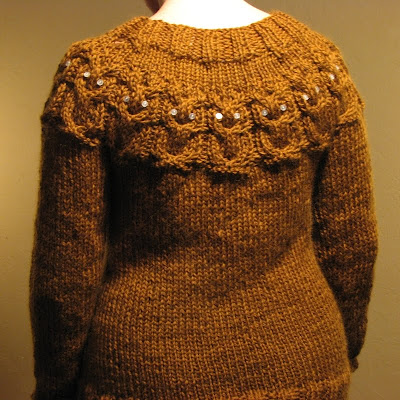
Owl Sweater

Here's my latest project, the Owl Sweater by Kate Davies. I love how it turned out!