Showing posts with label knitting. Show all posts

Tuesday, July 22, 2014

Sideways Cable Yoke Baby Sweater

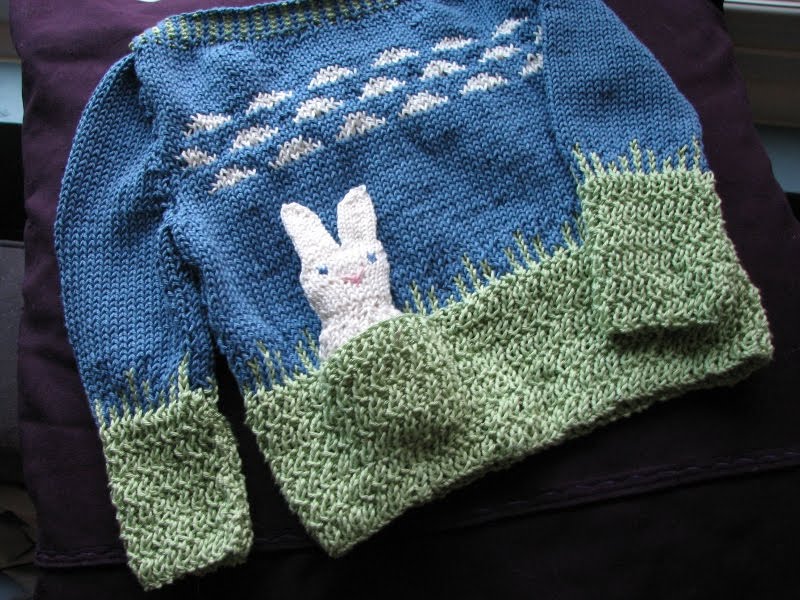
Clearance yarn + matching vintage buttons at the yarn store meant I couldn't resist playing a little bit. Hopefully, I'll test adjustments soon to make more sizes (3-6mo, 12-24mo) but wanted to get the original written down since it's time to start knitting for fall (or at least starting to plan). ;) I have a super bulky size 3/4T with a sideways cable yoke that I need to write down as well. I'm kind of in love with the sideways cable look right now. 

As always, I avoided seams. There is a little finishing to keep the front edges from rolling but I didn't want a border along the lower body to distract from the yoke. Neck, sleeve and bottom edges just have a couple rows  of garter stitch to keep them in place. 

If you make this pattern, please send me a picture or link to your own blog, ravelry (love looking at the completed projects here!), or facebook post so I can see how it turned out! This pattern is for personal use only and not for resale.

If you aren't a knitter and wish to custom order a sweater in the color of your choice, please contact me here or at moderncrafter.etsy.com. 

Also, if you follow the pattern, please leave me any feedback or corrections that will help improve the pattern for future users! Thank you!
(modeled on 17 pound child, with a 17" chest circumference)
Size
6-12mo. (chest circumference at arms = 22", sleeve from underarm to wrist = 5", back of neck to bottom = 9 1/2")

Materials
  • 120g Zitron Magnum yarn (3 skeins, Zitron Magnum is discontinued. It was a rayon/acrylic blend with 11wpi and 140yds/50g skein.)
  • 3 - 5/8" to 3/4" diameter buttons
  • Size 9 needles, one set circular and one set of double pointed
  • 2 stitch holders (large enough to accommodate 32 stitches each)
  • cable needle

Gauge
17 stitches x 26 rows = 4" x 4" in stockinette stitch
7 cable pattern repeats (28 rows) = 4", center 13 stitches of cable panel = 2"

Cable Pattern
LC (left cross): slip 2 stitches to cable needle, hold to front, knit 2 stitches, knit stitches from cable needle
RC (right cross): slip 2 stitches to cable needle, hold to back, knit 2 stitches, knit stitches from cable needle

Row 1: Slip 1, LC, k2, p1, LC, k2, p1
Row 2 and 4: Slip 1, purl 6, k1, purl 6, k1
Row 3: Slip 1, k2, RC, p1, k2, RC, p1


Notes
I make baby sleeves a little on the short side because my babies always seem to get sleeves pulled down and in their way. This pattern falls with the armpit about 1/2" lower than "actual" measurement on a child. There are instructions at the end of the sleeve section if you want to make the sleeves 1" longer ("standard" length)

Here's an excellent tutorial on picking up stitches from a slip stitch edge. I used the one loop method at the top and bottom of the yoke to avoid bulk but it does create the little holes along the top and bottom of the yoke. When finishing the front edges, pick up both loops. I also always pick up a stitch at the very beginning and end of a segment to get a smooth edge at the join. It's a good idea to count the chain stitches in the pick up edge of your work and divide it out to pick up evenly. Instructions are included if you end up with the same number as I had.

Instructions
Cable panel:
Cast on 15 stitches.
Row 1: Knit
Row 2: Slip 1 stitch and purl remaining stitches in the row.
Row 3 and on: Work Cable Pattern until piece measures just over 28" (mine was 50 pattern repeats =  202 rows total)
During final cable repeat (make buttonhole): Row 3: Slip 1, k2, RC, p1, yo, k2tog, RC, p1, Row 4 as normal
Cast off all stitches.

Create neckline:
Orient cable panel so buttonhole will be on right side.
Row 1 (on the top edge):  Using circular needles, pick up and knit 78 stitches from the slip stitch edge .
  • To evenly pick up the required stitches, pick up and knit in one chain stitch, a second chain stitch, and then picked up the 3rd and 4th chain stitch, knitting in both together. 202 rows = 101 chain stitches = about 76 stitches picked up + 1 at each end to get a clean edge.
Row 2: Slip 1, purl all remaining stitches
Row 3: Slip 1, k2tog, yo, k4, k2tog, *k8, k2tog* 6 times, k9 (make buttonhole, 71 stitches left)
Row 4,5,6: Slip 1, purl all remaining stitches
Row 7: Cast off while purling

Finish yoke and make body:
Turn the sweater over so it's upside down.
Row 1 (on the bottom edge): Using circular needles, pick up and knit 118 stitches (pick up an extra on each end and pick up two in one at about every 6 chain stitches from each end and every 8th chain stitch in the middle)
Row 2, 4, 6, 8: Slip 1, purl remaining stitches
Row 3: Slip 1, k1, M1, *k8, M1* 14 times, k1, yo, k2tog, k1 (make buttonhole, 133 stitches)
Row 5: Slip 1, k1 , M1, *k8, M1* 16 times, k3 (150 stitches)
Row 7: Slip 1, k4, M1, *k8, M1* 17 times, k5 (168 stitches)
Row 9: Slip 1, k25, place 32 st on a holder, cast on 2, k52, place 32 st on a holder, k26 (108 st left on needles for body, 32 st on holders)
Work in stockinette stitch (slipping the first stitch of each row) until body measures 9" down the middle of the back from the neckline, ending with a knit row. Knit next 2 rows (to create a bottom edge of garter stitch) then cast off.

Sleeves:
Starting at bottom center of armhole with double pointed needles, pick up and knit 2 st, k all stitches from holder, pick up and knit two more st. (36 stitches) (I like to leave an extra long tail when I join yarn here so I can tighten up any loose places in the underarm stitching when I weave in ends during finishing.)
Join the sleeve and begin working in the round, knitting every row.
Row 8, 12, 16, 20, 24: K1, k2tog, k to last 3 st, ssk, k1
(Decrease 2 st on the 8th row once and every 4th row after that 4 times, 10 st decreased, 26 st remaining)
Rows 25 and 26: Knit
Row 27: Purl
Row 28: Knit
Row 29:Cast off while purling
Repeat with the other armhole.
**To make the sleeves about 1" longer, decrease on Row 10, 15, 20, 25, and 30 (at 10th row and every 5th row for 4 times). Rows 25-29 in original pattern become Rows 31-35.**

Finishing:
Pick up and knit a row of stitches (one into each chain stitch), casting off as you go, between the bottom of the yoke to the bottom edge of the sweater on each front edge to prevent rolling. You could also single crochet into this edge but be mindful of gauge with this method. It's very easy to get the edge stretched too long or bunched up too tight.

Sew buttons onto opposite front to correspond to buttonholes.

Weave in all ends and lightly block.

Saturday, February 1, 2014

One Size Fits Most Hat Pattern

I designed this hat as a last minute Christmas gift in 2012 and it has become a family favorite. My brother, sister-in-law, husband, and mother each have one. I also wear one sometimes, when Willow (the toddler) hasn't stolen it (it's one of her favorites too) and I've sold a few. In a bulky yarn, it's a quick, easy knit and one size really does fit most people, toddler through adults. It's a slouch style on toddlers and more of a traditional stocking cap on adults. The diamond pattern is a simple variation on left and right twists, the only difference being that in each twist one stitch is knit and the other is purl (instead of both being knit st as in traditional LT and RT)

If you make this pattern, please send me a picture or link to your own blog, ravelry, or facebook post so I can see how it turned out! This pattern is for personal use only and not for resale.

If you aren't a knitter and wish to custom order a hat in the color of your choice, please contact me here or at moderncrafter.etsy.com.

Also, if you follow the pattern, please leave me any feedback or corrections that will help improve the pattern for future users! Thank you!

Materials
1 skein of Brown Sheep Lamb's Pride Bulky Superwash (110 yards/100g) or similar weight yarn
size 11 needles (one set double pointed and one set 16" rounds, or just the double pointed)
cable needle*
yarn needle

*Note for experienced knitters: I don't use a cable needle for this pattern since only 2 st change places, preferring to just slip both stitches off the left needle, put them back on the left needle in the correct order (careful to put the knit st to the front) and then working the stitches in pattern. (K the k and p the p)


Gauge
12 st x 16 rows for 4"x4" on size 11 needles in stockinette stitch

Abbreviations
AR (angle right) = slip next stitch (always a purl stitch) on to the cable needle and hold it to the back of the work, k1, then p1 from cable needle
AL (angle left)= slip next stitch (always a knit stitch) on to the cable needle and hold it to the front of the work, p1, then k st from cable needle

Notes
It has lots of stretch but, if for some reason you are making it for a head larger than 24" around, add another repeat of the diamond pattern by casting on an additional 8 stitches. 

If you need it longer than written (probably only necessary for a large man or someone who wants it very long over the ears), continue even in the diamond pattern to desired length, ending with Diamond Pattern Row 6. 

Instructions
Cast on 72 st and join in the round.
K2p2 rib for 10 rows
Next row, set up for diamond pattern:  p2, *k1, p3* to last 2 st, k1, p1
Work Diamond Pattern (see below) for 14 rows, ending after Row 6
Next row (Row 26): *p2, k2tog, p1, ssk, p1* to end (54 st left)
Row 27: *p2, k1, p1, k1, p1* to end
Row 28: *p1, k2tog, p1, ssk* to end (36 st left)
Row 29: *p1, k1* to end
Row 30: k2tog for 18 times (18 st left)
Row 31: k2tog for 9 times (9 st left)
Cut yarn, leaving long tail and use yarn needle to thread tail through remaining stitches two times, pull tight,
Weave in ends

Diamond Pattern
Row 1: *p1, AR, p3, AL* to end
Row 2, 4, 6, 8: Knit all knit stitches and purl all purl stitches
Row 3: *p1, AL, p3, AR* to end
Row 5: *p2, AL, p1, AR, p1* to end
Row 7: *p2, AR, p1, AL, p1* to end

Friday, January 17, 2014

2013 Crafting Album

I've been really bad about documenting any of my crafting for the last year. I'm trying to get better about it again because I've found it useful to be able to look back sometimes. Hopefully, things are settling into a rhythm where I can update again more frequently. I've got about 4 or 5 posts in my head that I want to do. We'll see. Anyway, here's the highlights of 2013.

January
Bamboo newborn sweater and booties for a friend's baby shower. Both patterns (Ruby Slippers and Matinee Jacket - my favorite girl sweater pattern) are in Vintage Knits for Modern Babies by Hadley Fierlinger.

February
 Stone carving class at the February Regional Waldorf Teacher's Conference at Shining Mountain School in Boulder. (It's an owl.)

March
 A baby quilt for Clarity, my first experience with crazy quilt foundation piecing on muslin and with free motion machine quilting

 During the worrying about Clarity time I knit this headband, a knit hat, and two pairs of booties. (Which she eventually wore a couple months later)


 Baby sweater and stuffed alligator (upcycled from an old sweater) for our newest nephew, born in April.
Hopefully, I'll get the sweater pattern posted at some point.

April
April was the month with no projects that needed to be made so I just used up leftovers.
 Modern Baby Bonnet from the Vintage Knits book (leftovers from the baby sweater)

Vintage Pixie Hat and Matinee Jacket (sized up to a 2/3T) from, you guessed it, Vintage Knits for Modern Babies. (sport weight Lamb's Pride Superwash left from Quentin's sweater)

May through August - busy having baby

September
Quick knit on the drive up to Mitchell, NE and back one day with Mom and the girls to go to the Brown Sheep Fiber Festival. It has turned out to be Willow's favorite hat and I've made several more to sell with leftover bulky yarns.

October
I quickly made a whole bunch of things in October for the annual boutique (1st weekend of November) because Mom had been worried that she didn't have enough stuff made. Apparently, she had spent the last four months watching her dear granddaughters as a help to their mother. :)
 The ubiquitous Matinee Jacket


Upcycling wool sweaters to make dragons!

November
First foray into doll making. Mom started commissioning me to make these little bunting babies for the extra large quiet books she makes.

.December
Clarity's stocking

Willow's 18" dressing doll, Josie

Willow slippers (upcycled sweater and pre-made sheepskin/suede soles)

Dad's handmade journal

Hat and cuddle doll for cousin Emmett (Wil had to model the hat.)

Cloth storage bins for Andy and Aimee (with some canned goods)

Knit shawl for Aunt Debbie (Q made the shawl pin and I'll post the pattern soon)

Tuesday, August 2, 2011

Fall Hat


I wanted a winter hat to match the black and purple striped scarf I made myself about 10 years ago but I don't like doing stripes in the round because I have a lot of trouble not making the rows jog. I think they look good together.

Purple and Black Nordic Hat
Gauge: 6 st per inch on size 4 needles; hat is 22" circumference
Yarn: Brown Sheep Cotton Fleece in black and purple
CO 132 stitches in black on size 4 16" circular needles and join in the round.
Work k2p2 rib for 6 rows.
Knit one row and change to size 6 16" circular needles.
Join purple and follow chart, repeating the motif 11 times per row. Knit one row black then repeat first 10 rows of chart.
Next row: * ssk, k9, work row 1 chart, k9, k2tog* (all stitches not in chart are in black) Repeat 3 more times; 8 stitches decreased
Continue decrease rows and chart as established for the next 8 rows, changing to size 6 double pointed needles when necessary, placing each of the four sections on separate needles.
Continue decrease rows using only black until there are only 3 stitches left on each needle.
Next row: *ssk, k1*, repeat 3 more times; 8 stitches left.
Break yarn, thread through the remaining stitches and pull them tight. Weave in all loose ends.

Sunday, July 31, 2011

Lester's Dressed

Lester's all ready for fall now with trousers, sweater, scarf and boots. I now don't have anything on the needles, which is a weird feeling.

Friday, July 29, 2011

Foxy Mugshots

Front

Back

Side

Here is Lester the Fox from Interweave Knits Weekend 2011. I've been waiting to post until his clothes were done but I've kind of been dilly-dallying and wanted something up before the weekend. His trousers and shirt are done, his scarf is in process and his boots aren't started. I always forget how fun it is to knit toys, especially when it's all yarn that was already in the stash. Speaking of the stash, here's today's project...
Considering that that's every bit of yarn I own, I feel like I'm pretty good about not hoarding too much but I don't know if this amount of yarn being "normal" in my mind is just another symptom of the disease. :) It's a tricky question - asking non-knitters or knitters will each get opposite and equally biased answers in my experience. The two cardboard boxes at the back are acrylics from the liquidation of Q's grandmother's stash. I'm trying to decide what to keep out of them. They could be handy to have around for very specific projects (i.e. keeping the 3 skeins of olive green for a knit farm play mat in a couple of years) but I also really don't like the results when acrylic is used for garments. We'll see.

Tuesday, July 19, 2011

Glasgow Lace Sweater

This is the Glasgow Lace sweater from Interweave Knits, Fall 2006. A friend gave me enough skeins of Berroco Blackstone Tweed to make a sweater so I thought I'd better get it done before baby.

I lengthened the sleeves to about 3/4 rather than 1/2. Below is a picture of me wearing it because I think it shows better that way but remember, it's not a maternity sweater! I'm sure it will look a lot better when not stretched over the belly and I hope it will get a little longer when it doesn't have to be so wide.


It's out of focus but I thought I should post a 34 week, 2 day baby bump picture. We're getting close!

Monday, July 18, 2011

1st Birthday Present


Amazing that our nephew is already turning one! I've already made the Hooded Kaftan pattern from Debbie Bliss' Ecobaby book before but I realized for a great big toddler, it really needed to have a pocket added. And what does a red hoodie's pocket need? A monkey, of course.

I again used Berocco Touche on size 7 needles. The gauge was way bigger than the original pattern but using the smallest size's stitch numbers and the 24-36 mo. pattern's inch measurements worked out perfectly.

The pocket was just casting on 40 st, stockinette for 10 rows then short rows (wrap and turns at each end). The short rows progressively left 6 stitches unknit at each end, then 3 more, then 2 more, then 1 more 3 times, which left 12 stitches at the top to cast off. All of the stitches that had been left behind on the short rows were then knit in garter stitch for 4 rows, k2 together 6 stitches from the outside edge on every other row, then casting off. Lightly block everything then stitch the pocket on (after attaching a monkey, if desired). Wow, it sounds more complicated than it is to do. I think it turned out really cute and I really think I'm in love with this pattern - I never knit a pattern twice!

Friday, July 1, 2011

Wool Soakers


I got four soakers made using the Little Turtle Knits Hybrid Rib Soaker pattern and yarn from my stash. All are the newborn size and two are daytime weight and two are nighttime weight. They're really easy to knit so if they work out it should be easy to make larger sizes after baby gets here.

To lanolize them, I soaked them in some lukewarm water that had a tiny bit of Woolite and some lanolin thoroughly mixed in. After they soaked, I just drained them, pressed as much water out as possible, then rolled them in a towel and squeezed. They're air drying on a drying rack now. It's pretty easy so I hope they work.

I got another 12 1/2 lbs. of strawberries picked today and only picked about half the bed. We invited a neighbor over tomorrow morning to pick some for herself. I'm sure we've got enough to share. ;)

Monday, June 27, 2011

Brown Cabled Sweater

This was adapted from the Hawthorn Pullover in Interweave Knits except I wanted a cardigan. This yarn has been trying to become a brown cardigan for 3 or 4 years and had gotten it's first several inches knit in an entirely different pattern before getting ripped out. The latest incarnation made it onto the "must get done before the baby comes" list of project finishing. I knew that it would languish indefinitely if it waited any longer.


I can't model it because it's sized to "pre-baby" me. I wanted it to be quite form fitting because there were sleeveless dresses I wanted to wear with it in fall. I'm a little worried the sleeves turned out too snug but we'll have to just wait until post-baby sizing to get a true picture. Here I come Fall 2012! :)

Today was one of those crazy productive days.
  • Milled enough wheat to fill the gallon jar of flour
  • Garbanzo beans were cooked and pita dough was made for falafel tonight
  • A batch of strawberry jam was made
  • Out in the garden I had my first "snack as you go" for the season - peas, radishes, strawberries and one tiny carrot that needed to be thinned. There was also a lot of grass removal and seed planting as well as almost 6 lbs. of strawberries harvested.
  • One load of laundry was folded along with other miscellaneous cleaning
  • Two quarters of the color wheel quilt got done - although they may have to be resewn. Getting the curve pinned and sewn so everything lies flat is very very tricky.
At about 3:30p, I came in from the garden and noticed my ankles were swelling so I've put myself on a prescription of fluids and putting my feet up for the rest of the day. Considering my challenges self-regulating, it would probably be helpful if nature gave me such clear signs of overdoing it even when I wasn't pregnant. I do hate "cankles" so I'd probably pay attention.

Tuesday, May 17, 2011

Spring Meadows Toddler Sweater


Mom gave me two skeins of blue Patons Grace. I already had one skein of green in the stash and had to buy a skein of white. It's sort of like using up my stash if I used almost all of 3 skeins and only added one more to the stash, right?

This sweater has a little subtle shaping using short rows to pull the neck down slightly since there is no shoulder shaping - they are only lapped. The color work using the crisp cotton yarn can be a little tricky but it's relatively simple. I need to make a knit yellow baby chick as well so there are options for the pocket. Hopefully I'll have a baby who can wear size 24 mo. some spring.


Finished measurements - Size 24 mo.:
Chest circumference: 22"
Back length: 10 1/2"
Armhole depth: 5"
Sleeve length to underarm: 6 1/2"

Materials:
Paton Grace yarn in Viola ("blue", 2 skein), Ginger ("green", 1 skein), and Snow ("white", 1 skein)
16" size 4 knitting needles (or needle size to obtain gauge)

Gauge:
24 st. x 28 rows = 4"x4"

Grass Stitch
Row 1-4: K1,P1; repeat to end
Row 5-8: P1,K1; repeat to end

Wrap and Turn (w&t)
Right side: Keeping yarn in back, slip next stitch to right needle, pull yarn to front, slip stitch back to left needle, turn work

Wrong side: Keeping yarn in front, slip next stitch to right needle, pull yarn to back, slip stitch back to left needle, turn work

Grass Stem Chart
Repeat these 8 stitches to the end of the round.

Cloud Chart
Add 4 blue stitches at each side of the chart. Repeat the center 27 stitches (between the bold lines) two times across the front and back of the sweater.


Instructions:
Pocket:
Cast on 16 stitches in green.
Work in stockinette stitch for 15 rows, or until the piece measures 2".
Place all stitches on a holder and cut yarn, leaving a long (1') tail.

Body:
CO 144 stitches in green, join in the round.
Complete 24 rows of Grass Stitch.
Row 25: K 14 stitches, cast off 16 stitches, K remaining stitches.
Row 26: K 14 stitches, knit 14 Pocket stitches from holder, K remaining stitches.
Join blue yarn. Complete next 6 rows using the Grass Stem chart. Cut the green yarn.
Next Row: Using blue, K 70, K2tog, K70, K2tog
Knit in blue until the body measures 6 1/2" from bottom (about another 18 rows).
Next Row: K69, cast off 2, K69, cast off 2

Front and back:
The front will now be worked flat. When finished, repeat these instructions for the back.
Row 1: SSK, K65, K2tog
Row 2: Purl
Row 3: SSK, K63, K2tog
Row 4: Purl

Joining the white yarn, work the next 14 rows using the cloud chart. Cut white yarn.

Work 2 rows in blue in stockinette stitch

Next 18 rows:
Row 1 (7, 13): K22 (20, 18), w&t
Row 2 (8, 14): P22 (20, 18)
Row 3 (9, 15): K 22 (20, 18), knit together next stitch and the loop wrapped around it, k to end
Row 4 (10, 16): P 22 (20, 18), w&t
Row 5 (11, 17): K22 (20, 18)
Row 6 (12, 18): P 22 (20, 18), purl together next stitch and the loop wrapped around it, p to end

Join green yarn and work in k1p1 rib for 5 rows. On the right side, knit stitches are in blue and purl stitches are in green.
Cut green yarn. Cast off all stitches in blue.

Sleeves (make 2):
Cast on 42 stitches.
Complete 24 rows of Grass Stitch
Join blue yarn. Complete next 6 rows using the Grass Stem chart on the middle 40 stitches. Work 1 stitch at each end in blue. Cut the green yarn.
Work 20 rows in stockinette stitch.
Cast off 3 stitches at the beginning of the next 2 rows - 36 stitches remaining

Next 6 rows:
Right side row: K1, ssk, k to last 3 st., k2tog, k1
Wrong side row: Purl
30 stitches remaining

Rows 1,2: Stockinette stitch
Row 3: K1, ssk, k to last 3 st., k2tog, k1
Row 4: Purl
Repeat rows 1-4 5 more times - 18 stitches remaining

Cast off all stitches.

Finishing:
Sew up sleeves to cast off stitches using mattress stitch.
Lap the ribbing at the top of the front and back and pin in place.
Sew in sleeves, making sure to catch all three layers at the shoulders where the ribbing is lapped.
(Pin the center of the sleeve top to the center of the lapped ribbing. Pin the sleeve seam to the center of the armpit on the body. The top 18 cast off sleeve stitches have been eased in at the top of the sleeve cap roughly between the two pins shown in the picture above. The rest of the sleeve is sewn to the body just matching up the sleeve and body stitches.)

Use the long tail from the pocket to sew a running stitch around the sides and bottom, hiding stitches on the right side as well as possible.
Weave in all ends.

Bunny pattern:
The bunny uses the same gauge and size 4 double pointed needles.

Use a provisional cast on to CO 16 stitches in white.
Work 18 rows back and forth in stockinette.
Next row: K2, k2tog, k1, k2tog, k2, k2tog, k1, k2tog, k2
Purl following row.
Next row: K3, M1 (M1 increase instructions can be found here), k2, M1, k3, M1, k2, M1, k2
Purl following row.
Work 16 rows in stockinette.
Place the stitches from the provisional cast on onto the needles with the other stitches and knit one row, joining them in the round and k2tog at the two sides where the sets of stitches meet - 30 stitches
You now have a loop of knitting hanging from your needles. This will be the bunny's body.

Shoulders and neck:
Row 1: *K3, k2tog*, repeat to end - 24 stitches
Row 2: *K1, k2tog*, repeat to end - 16 stitches
Row 3: *K2, M1*, repeat to end - 24 stitches
Knit 7 rows for the head.

Ears:
Row 1: K6, slip next 12 stitches to holder, k6
Row 2: K5, k2tog, k5
Row 3-11: K (or add rows until the bunny's ear is long enough)
Row 12: K3, k2tog, ssk, k3
Row 13: K2, k2tog, ssk, k2
Cut yarn, leaving long tail, and pull through all remaining stitches. Gather the stitches together and sew a running stitch down the center of the ear to flatten it.
Join yarn and repeat the ear instructions with the other 12 stitches from the holder.
After both ears are completed, you may need to sew a couple extra stitches between the ears to get rid of any holes.

Finishing:
Starting at the neck, use a mattress stitch to sew down to the decrease/increase rows, which should be at the bottom of the hanging loop. Use a running stitch to go across the bottom between the increase and decrease rows and gather slightly; secure the yarn so it doesn't gather more. Stuff the bunny lightly - it should still be squishy and not strain the stitches. Sew, using mattress stitch, from the bottom to the neck on the remaining side. Hide your ends inside the body. Use embroidery floss or bits of spare yarn to sew on two black eyes and a pink nose.