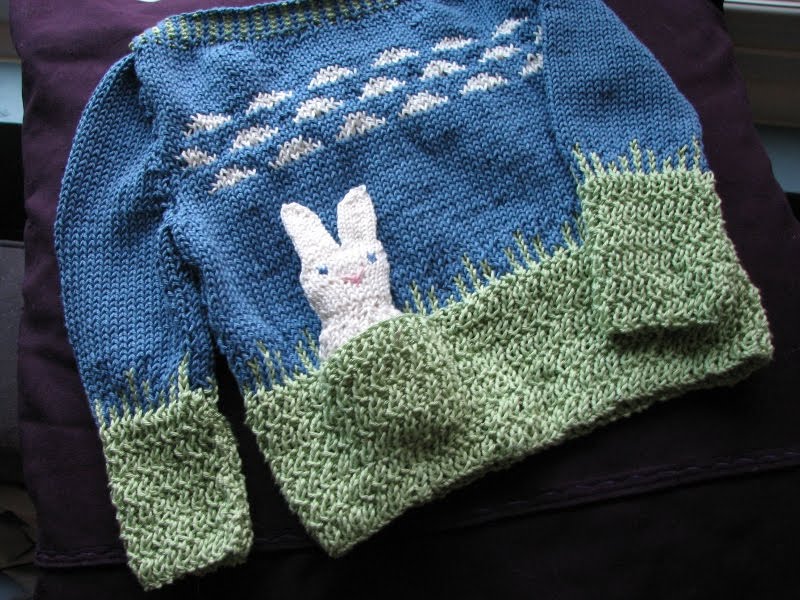
Mom gave me two skeins of blue Patons Grace. I already had one skein of green in the stash and had to buy a skein of white. It's sort of like using up my stash if I used almost all of 3 skeins and only added one more to the stash, right?
This sweater has a little subtle shaping using short rows to pull the neck down slightly since there is no shoulder shaping - they are only lapped. The color work using the crisp cotton yarn can be a little tricky but it's relatively simple. I need to make a knit yellow baby chick as well so there are options for the pocket. Hopefully I'll have a baby who can wear size 24 mo. some spring.

Finished measurements - Size 24 mo.:
Chest circumference: 22"
Back length: 10 1/2"
Armhole depth: 5"
Sleeve length to underarm: 6 1/2"
Materials:
Paton Grace yarn in Viola ("blue", 2 skein), Ginger ("green", 1 skein), and Snow ("white", 1 skein)
16" size 4 knitting needles (or needle size to obtain gauge)
Gauge:
24 st. x 28 rows = 4"x4"
Grass Stitch
Row 1-4: K1,P1; repeat to end
Row 5-8: P1,K1; repeat to end
Wrap and Turn (w&t)
Right side: Keeping yarn in back, slip next stitch to right needle, pull yarn to front, slip stitch back to left needle, turn work
Wrong side: Keeping yarn in front, slip next stitch to right needle, pull yarn to back, slip stitch back to left needle, turn work
Grass Stem Chart
 Repeat these 8 stitches to the end of the round.

Repeat these 8 stitches to the end of the round.
Cloud Chart
Add 4 blue stitches at each side of the chart. Repeat the center 27 stitches (between the bold lines) two times across the front and back of the sweater.
Instructions:
Pocket:
Cast on 16 stitches in green.
Work in stockinette stitch for 15 rows, or until the piece measures 2".
Place all stitches on a holder and cut yarn, leaving a long (1') tail.
Body:
CO 144 stitches in green, join in the round.
Complete 24 rows of Grass Stitch.
Complete 24 rows of Grass Stitch.
Row 25: K 14 stitches, cast off 16 stitches, K remaining stitches.
Row 26: K 14 stitches, knit 14 Pocket stitches from holder, K remaining stitches.
Join blue yarn. Complete next 6 rows using the Grass Stem chart. Cut the green yarn.
Join blue yarn. Complete next 6 rows using the Grass Stem chart. Cut the green yarn.
Next Row: Using blue, K 70, K2tog, K70, K2tog
Knit in blue until the body measures 6 1/2" from bottom (about another 18 rows).
Next Row: K69, cast off 2, K69, cast off 2
Front and back:
The front will now be worked flat. When finished, repeat these instructions for the back.
Row 1: SSK, K65, K2tog
Row 2: Purl
Row 3: SSK, K63, K2tog
Row 4: Purl
Joining the white yarn, work the next 14 rows using the cloud chart. Cut white yarn.
Work 2 rows in blue in stockinette stitch
Next 18 rows:
Row 1 (7, 13): K22 (20, 18), w&t
Row 2 (8, 14): P22 (20, 18)
Row 3 (9, 15): K 22 (20, 18), knit together next stitch and the loop wrapped around it, k to end
Row 4 (10, 16): P 22 (20, 18), w&t
Row 5 (11, 17): K22 (20, 18)
Row 6 (12, 18): P 22 (20, 18), purl together next stitch and the loop wrapped around it, p to end
Join green yarn and work in k1p1 rib for 5 rows. On the right side, knit stitches are in blue and purl stitches are in green.
Cut green yarn. Cast off all stitches in blue.
Sleeves (make 2):
Cast on 42 stitches.
Complete 24 rows of Grass Stitch
Join blue yarn. Complete next 6 rows using the Grass Stem chart on the middle 40 stitches. Work 1 stitch at each end in blue. Cut the green yarn.
Work 20 rows in stockinette stitch.
Cast off 3 stitches at the beginning of the next 2 rows - 36 stitches remaining
Next 6 rows:
Right side row: K1, ssk, k to last 3 st., k2tog, k1
Wrong side row: Purl
30 stitches remaining
Rows 1,2: Stockinette stitch
Row 3: K1, ssk, k to last 3 st., k2tog, k1
Row 4: Purl
Repeat rows 1-4 5 more times - 18 stitches remaining
Cast off all stitches.
Finishing:
Sew up sleeves to cast off stitches using mattress stitch.
Lap the ribbing at the top of the front and back and pin in place.
Sew in sleeves, making sure to catch all three layers at the shoulders where the ribbing is lapped.
 (Pin the center of the sleeve top to the center of the lapped ribbing. Pin the sleeve seam to the center of the armpit on the body. The top 18 cast off sleeve stitches have been eased in at the top of the sleeve cap roughly between the two pins shown in the picture above. The rest of the sleeve is sewn to the body just matching up the sleeve and body stitches.)

Use the long tail from the pocket to sew a running stitch around the sides and bottom, hiding stitches on the right side as well as possible.
Weave in all ends.
Bunny pattern:
The bunny uses the same gauge and size 4 double pointed needles.
Use a provisional cast on to CO 16 stitches in white.
Work 18 rows back and forth in stockinette.
Next row: K2, k2tog, k1, k2tog, k2, k2tog, k1, k2tog, k2
Purl following row.
Next row: K3, M1 (M1 increase instructions can be found here), k2, M1, k3, M1, k2, M1, k2
Purl following row.
Work 16 rows in stockinette.
Place the stitches from the provisional cast on onto the needles with the other stitches and knit one row, joining them in the round and k2tog at the two sides where the sets of stitches meet - 30 stitches
You now have a loop of knitting hanging from your needles. This will be the bunny's body.
Shoulders and neck:
Row 1: *K3, k2tog*, repeat to end - 24 stitches
Row 2: *K1, k2tog*, repeat to end - 16 stitches
Row 3: *K2, M1*, repeat to end - 24 stitches
Knit 7 rows for the head.
Ears:
Row 1: K6, slip next 12 stitches to holder, k6
Row 2: K5, k2tog, k5
Row 3-11: K (or add rows until the bunny's ear is long enough)
Row 12: K3, k2tog, ssk, k3
Row 13: K2, k2tog, ssk, k2
Cut yarn, leaving long tail, and pull through all remaining stitches. Gather the stitches together and sew a running stitch down the center of the ear to flatten it.
Join yarn and repeat the ear instructions with the other 12 stitches from the holder.
After both ears are completed, you may need to sew a couple extra stitches between the ears to get rid of any holes.
Finishing:
Starting at the neck, use a mattress stitch to sew down to the decrease/increase rows, which should be at the bottom of the hanging loop. Use a running stitch to go across the bottom between the increase and decrease rows and gather slightly; secure the yarn so it doesn't gather more. Stuff the bunny lightly - it should still be squishy and not strain the stitches. Sew, using mattress stitch, from the bottom to the neck on the remaining side. Hide your ends inside the body. Use embroidery floss or bits of spare yarn to sew on two black eyes and a pink nose.
10 comments:
I love your little bunny!
This is such a cute sweater. I just started working on it for my son for Easter. I am very frustrated though because my yarn store didn't have the shade viola... Had to travel to another store to find it. Only to find that viola is not blue at all but purple. What a waste of time and energy trying to find the wrong color.
Bummer. I wonder if they've changed the formulation of that color since I bought it 6 or 7 years ago. It was definitely blue when I bought it. I'm sorry about the time sink!
My sweater is all finished except I can't figure out exactly how the sleeves fit at the top, since there are 18 cast off stitches at the top of the sleeve, where does that extra go? Lapping the neckline ribbing I think I understand, but that 2-1/2 inches of sleeve has to go someplace. Please help.
I just updated the sweater finishing instructions above with a picture and more specific directions for setting in the sleeves. I'm sorry it was unclear and I hope it helps, togetheron4949!
Thank you thank you. It makes perfect sense now. I was so frustrated. I am making it for a almost one year old great granddaughter who lives 3000 miles away from me. It will be too big for her now, but maybe later in the winter. It is such a cute sweater and now I can finish it and make the bunny.
Here I am again! The sweater is finished and I am working on the bunny. Found out how to do provisional cast on with the help of YouTube. I am ready to put the provisional stitches onto the needle. Do I put them on the left end? Will I be using three needles (and knitting with the fourth). I haven't done very much knitting that way, but some. I have been knitting for nearly 80 years including Aran and fair isle and this has been the most challenging project I have ever tackled. Thank you so much for your help.
This bunny starts just knitting back and forth, flat, from one needle to another. When the flat piece gets long enough (after the 38 rows directions are given for), those provisionally cast on stitches just go on to one needle and the top stitches stay on the needle they were on - two needles attached to opposite ends of a rectangle right now.
Now I'll try to give more specific instructions for joining them in the round. Three double pointed needles will have stitches and you'll use the fourth to knit. (I'm warning you in advance, it's complicated to explain precisely but achieves something pretty straightforward.)
Needle 1 (start at the top stitches where you already have yarn attached) - Knit across 11 stitches from the stitches you had been working.
Needle 2 - Knit 4 more stitches. Slip the last stitch on to the needle from the bottom, with the provisional cast on stitches. (Make sure you don't twist the rectangle of fabric as you join.) K2tog (the last stitch from the top corner and first stitch from the bottom corner). Knit 5 more stitches.
Needle 3- Knit nine of the last ten provisional cast on stitches. Slip the last stitch on to the beginning of Needle 1 and k2tog from that needle.
You now have three needles with ten stitches apiece, joined in the round. Continue with the "Shoulders and Neck" instructions.
When you get to the ears, just divide the twelve stitches for each ear on to three needles, four stitches per needle, and knit in the round - just like doing glove fingers.
I was playing with some unusual construction techniques when I made this pattern. Sorry it's a bit confusing for such a simple looking project. I should have taken pictures as I went so there could be more visuals.
I am an experienced knitter and I am having trouble understanding your directions. On the first page of your instructions at the bottom you explain wrap and turn parentheses WNT. I’m not finding that in the instructions of the sweater. Can you please tell me when I would be doing that. And is that what you’re calling a short row. Thanks
Hermosos modelos le are a mi nieto gracias por enseñarnos
Post a Comment